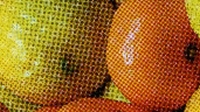
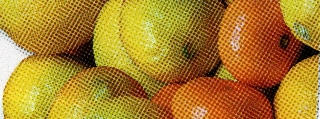
 A moiré pattern typically occurs when you scan a printed picture and then view or print out that scan. The above picture is a classic example.
This discusses how to use GIMP to remove, or mostly remove from your scan, the typical underlying cause of moiré patterns. The process we are going to use is generically called “descreening” but the exact process we will utilize is Fourier transforms.
Resources
Descreening with GIMP and Fourier transforms
http://www.albumartexchange.com/forums/viewtopic.php?f=2&t=1986
GIMP home page
http://www.gimp.org/
GIMP descreen plugin
http://registry.gimp.org/node/24411
What causes moiré patterns
Commercial printing presses typically only print solid colors – they don’t print shades. So they normally only print CMYK, Cyan Magenta Yellow Black (K). To get other colors it is necessary to mix colors and use shades. For example to get violet you should use cyan @ 55%, magenta @ 80%, yellow @ 55% and black @ 65%.
 If a printer needs print wants to print violet they will print tiny circles of cyan, magenta, yellow and black. The cyan circles will have a surface area of 55, magenta a surface area of 80, yellow a surface area of 55 and finally black with a surface area of 65. This way there will be more magenta in the picture than yellow for example. Basically the lighter the shade the smaller the dots and the more white paper around them.
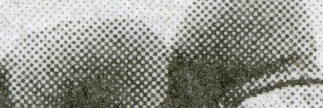
In the scan to the right you can see that the top of the picture is almost full magenta but the size of the magenta dots varies throughout the scan with smaller dots and more white paper in some areas giving the illusion of a lighter color.
The problem with this printing technique is that it produces a very grid-like pattern, not a perfect grid but very “grid like”. This is best illustrated in a black and white picture:
 Computer scanner does a precise grid scan of an image combined with the printing process’s grid like technique , which produces moire effects. As I say a lot of printing works like this but not all – laser printers don’t and neither do true photo graphic (chemical) prints.
What can be achieved
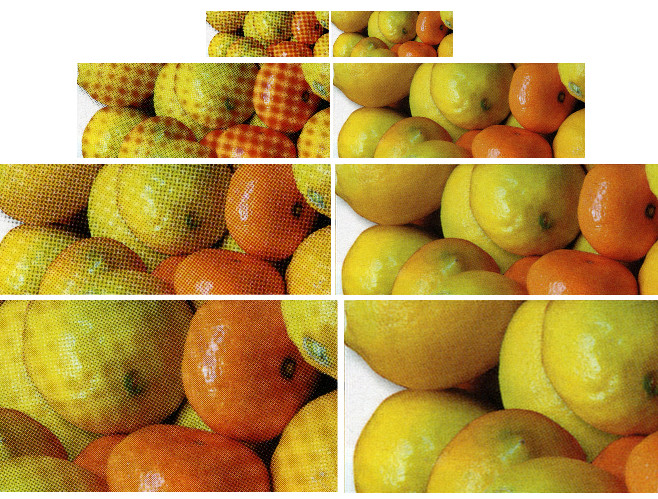
In order to illustrate what can be achieved I scanned a print of some lemons and mandarins. I then made a second copy of the first image, but this time ran a “descreen” through it. Finally I then created a third image file twice as wide as the orginal. In this third image I put the original scan on the left and the descreened version on the right – so side-by-side comparison, no tricks.
I then opened up this third image in Internet Explorer and changed the zoom and below is what I got:
Gimp descreen setup
If you haven’t heard of GIMP it is a free open source image editor much like Photoshop. It takes a bit of getting used to as does Photoshop I imagine – but I like it Its website says:
GIMP is the GNU Image Manipulation Program. It is a freely distributed piece of software for such tasks as photo retouching, image composition and image authoring. It works on many operating systems, in many languages. (more…)
Setup
| 1. | Install GIMP. I used the 32/64bit version of GIMP 2.6.10:
gimp-2.6.10-setup.exe As a 64bit app it installed to: C:\Program Files\GIMP 2 |
||||||
| 2 | Get the Fourier plugin for GIMP from Git Hub. It is located in the folder:
https://github.com/pixlsus/registry.gimp.org_static/tree/master/registry.gimp.org/files There are a huge number of files at this location so you need to click on the find button to find the one you want. The find button is currently: https://github.com/pixlsus/registry.gimp.org_static/find/master When this article was originally written I used version 0.4.1 but that was a while ago and that version is not available. I would suggest fourier-0.4.3-win64.zip which is at: Note: If you are running GIMP in 32bit mode then you need the 32bit version of the |
||||||
| 3. | Unzip the Fourier plugin and copy the 32bit version of “fourier.exe” and put in:
C:\Program Files (x86)\GIMP-2.0\lib\gimp\2.0\plug-ins |
||||||
| 4. | Copy “libfftw3-3.dll” from the same source directory as “fourier.exe” and put this in:
C:\Program Files (x86)\GIMP-2.0\bin |
||||||
| 5. | Get the descreen plugin:
http://registry.gimp.org/node/24411 This should be descreen.scm |
||||||
| 6. | Copy “descreen.scm” to:
C:\Program Files (x86)\GIMP-2.0\share\gimp\2.0\scripts |
||||||
| 7. | You need to edit “descreen.scm”
|
||||||
| 8. | You may possibly need to be careful whether you save this file in DOS or Unix format – as in what constitutes end of line. |
Running the descreener
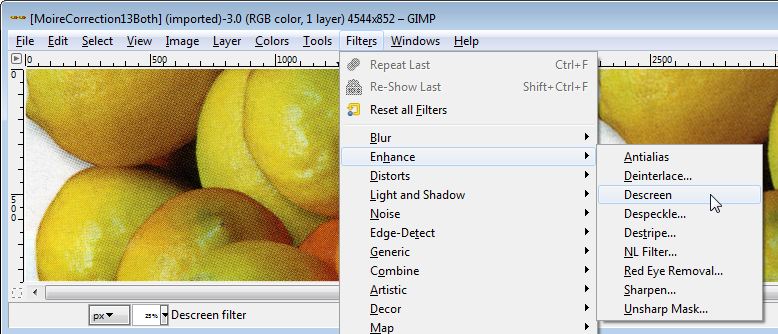
Select “Descreen” from the GIMP menu:
 The default settings are:
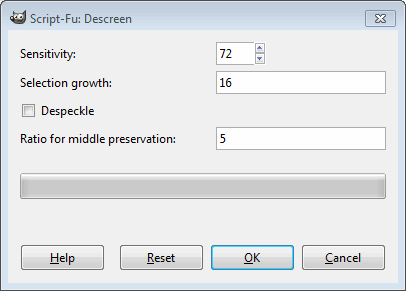 However you might want to try:
Sensitivity: 90
Selection growth: 16
Ratio for middle preservation: 3
Despeckle: off
Thanks
Got an email on 8th May 2020 with suggestions from Joe – Thanks very much