My kit for this exercise is:
SonicWall: TZ 215, (SonicOS Enhanced 5.9.1.10-1o)
SonicWall setup
This section creates the SonicWall stuff that takes the VLAN from the VMware ESX host and connects it to a SonicWall interface port.
To keep everything simple because we are using the SonicWall interface “X2” we will call the zones “HDHomeRunX2” and “HDHomeRunX2Wireless” with the subnet being “192.168.222.0″ and the VLAN port being 22.
Create a SonicWall trusted zone
Login to the SonicWall and navigate to “Network | Zones” and add a new zone:
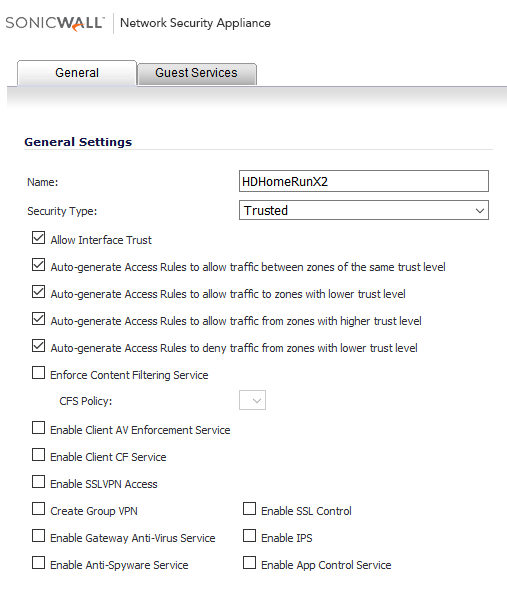 I am going to setup two HDHomeRuns and they will plug into the X2 and X3 interface ports on the SonicWall. For this reason I am naming the zone “HDHomeRunX2“.
On the “Guest Services” tab leave it as default with “Enable Guest Services” deselected.
Create a SonicWall wireless zone
Between MythTV and HDHomeRuns it is very challenging to get a MythTV backend to talk to a homerun which is on a different subnet. The intention here is to create a situation where the interface port on the SonicWall, in this case “X2”, is seen and searchable on the NIC port of the MythTV. In addition MythTV is running in VMware ESX and the NIC is using a VLAN.
Also the ESX server and MythTV VM are running on the LAN. This means the VLAN for the homerun boxes is presented on the LAN.
To achieve this we really need a bridge between the VLAN, on the LAN and the physical interface port. The only way I could find to do this and I am not a guru so there might be other ways, is to set up a “Wireless” zone.
So while still logged into the SonicWall add another zone:
 Note: It is important to deselect “only allow traffic generated by a SonicPoint” and as before disable “Enable Guest Services” on the “Guest Services” tab.
Create VLAN Sub-Interface on LAN
In the SonicWall go to “Network | Interfaces” and click on “Add Interface” selecting “Virtual Interface”:
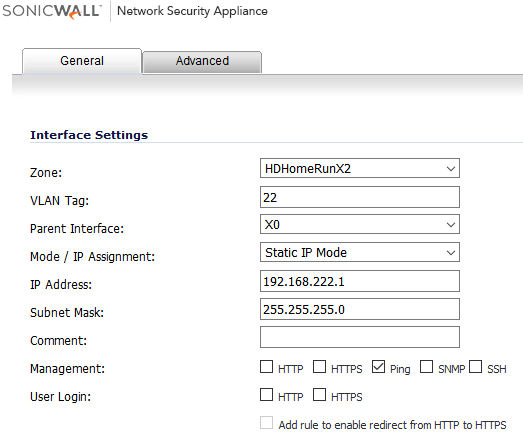
 Set it up as:
Zone: HDHomeRunX2
VLAN Tag: 22
Parent Interface: X0
Mode / IP Assignment: Static IP Mode
IP Address: 192.168.222.1
Subnet Mask: 255.255.255.0
Management: Ping
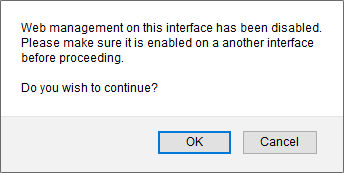
And click “OK” to save. You will likely get a dialog which says that you have not enabled web management on this interface, that is to be expected as we are not managing it directly from the VLAN, so click OK to continue:
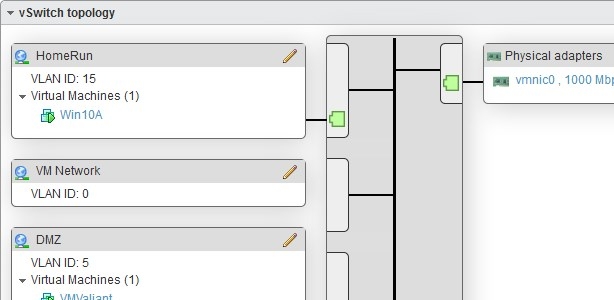
You will now see this appear under the X0, aka. LAN, interface: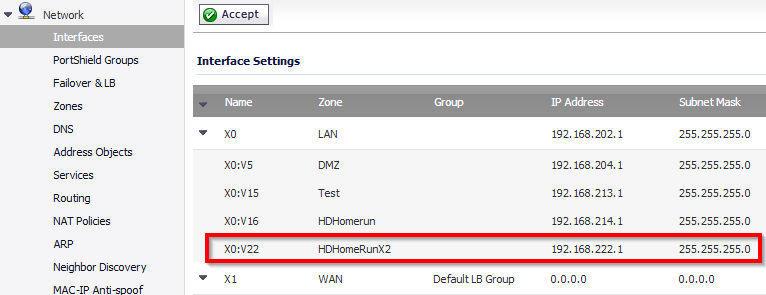
Modify the X2 interface settings
At this point we need to bridge the interface “X2” to the Sub-Interface “X0:V22”, this is why we created the “HDHomeRunX2Wireless” zone, because only wireless zones allow bridging.
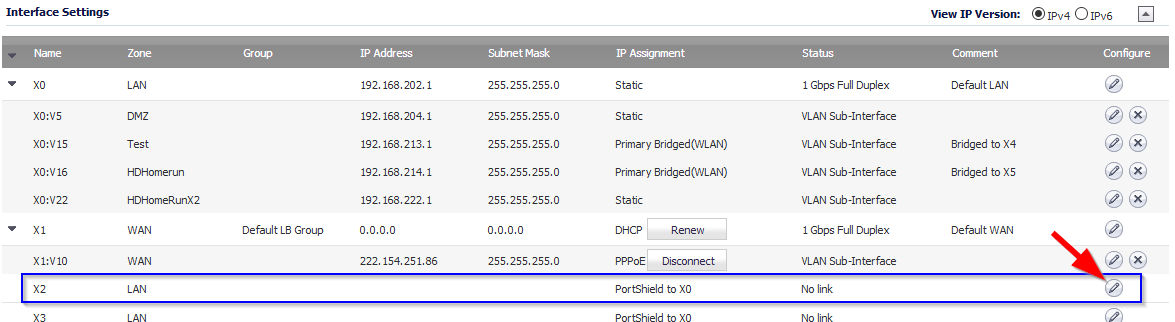
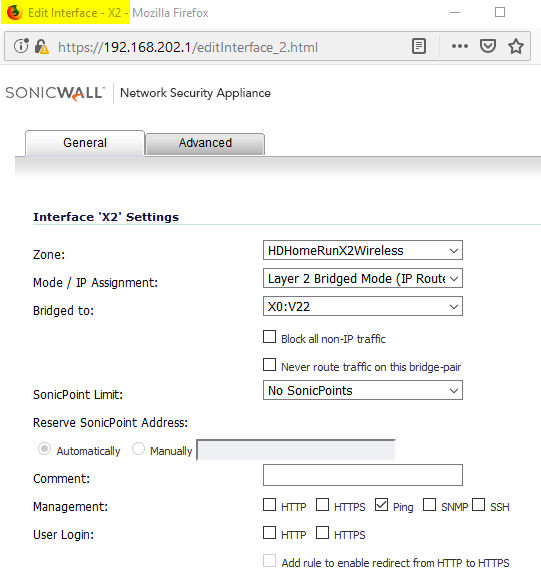
So click on the edit button for the X2 interface from “Network | Interfaces”:
You should set this up as:
Zone: HDHomeRunX2Wireless
Mode / IP Assignment: Layer 2 Bridged Mode (IP Route Option)
Bridged to: X0:V22
SonicPoint Limit: No SonicPoints
Management: Ping
When you open up the dialog to edit the interface it will show the interface name in the title – see the yellow highlighting below – check
 When setting the “Mode / IP Assignment” you will get a popup, this is fine so click “OK”:
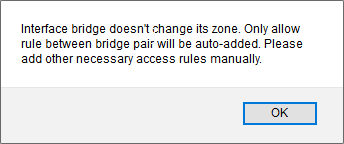
When saving the interface changes you will likely get the below dialogs because we have set the “SonicPoint Limit” to “No SonicPoints”. Click OK to both dialogs.
When complete you will see this under interfaces
![]() Setup DHCP
Setup DHCP
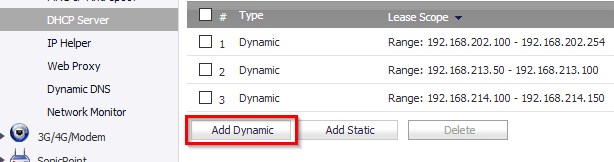
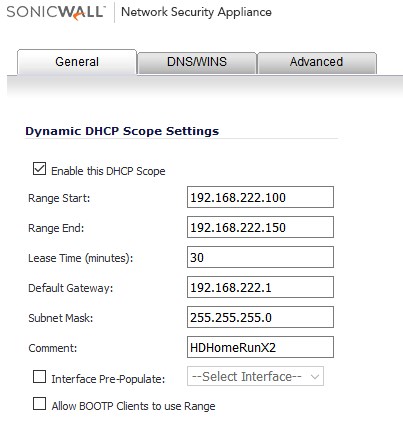
In the SonicWall under “Network | DHCP server” select “Add Dynamic”:
 Set as:
Range Start: 192.168.222.100
Range End: 192.168.222.150
Lease Time: 30
Default Gateway: 192.168.222.1
Subnet Mask: 255.255.255.0
Comment: HDHomeRunX2
 After you save this it will automatically figure out which interface it belongs to:
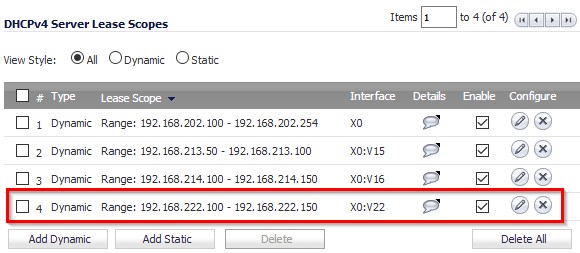 ESXi Setup
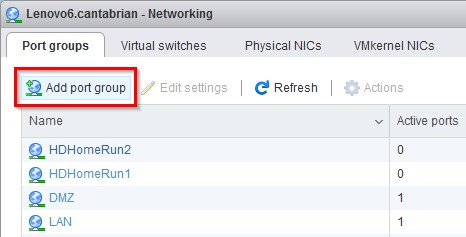
In the ESXi VMware Host Client and select “Networking” and the default tab should be “Port groups”. So click on “Add port group”:
 Enter the following
Name: HDHomeRunX2
VLAN ID: 22
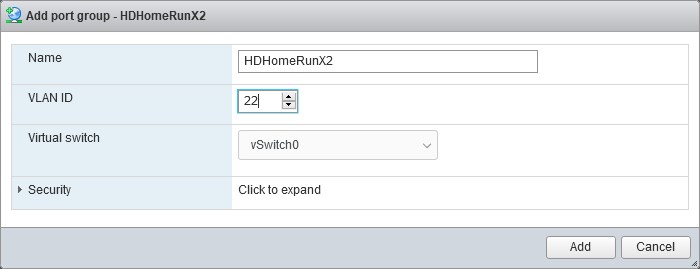 Click “Add” to save.
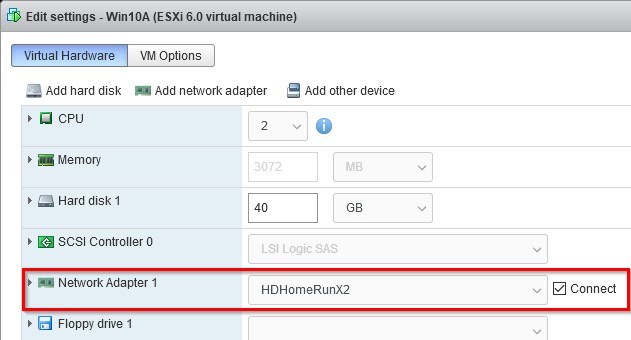
Obviously you need to change the ESX setting for your VM to use this new port group:
 Testing
The last thing to do is to plugin a laptop into the X2 port of the SonicWall and start up the VM.
Once the VM and laptop are connected and running they should both get DHCP addresses in the range 192.168.222.100 – 192.168.222.150 and they should be able to ping each other by IP and hopefully by name.
You may find that you need to disable firewalls on the Windows VM and laptop so they can see each other – but that is a problem outside the scope of what we are trying to achieve here.