 I run WordPress on Apache 2.2 on RedHat. A WordPress instance, is just a bunch of PHP files, various image files and uploaded files and a database – that’s pretty much it. So to backup and restore you need to back up one directory tree and a DB.
This post details what I did to go from a backup of WordPress on one server to a completely new server. The old host was PHP 5.4 and Apache httpd 2.4.4-3. The new server is PHP 7.2 and Apache httpd 2.4.6-88. The original host is Fedora 18, August 2013 and the new one is CentOS 7 June 2019 – so six years difference.
When I am doing this restore I am doing it as root because if I really screw it up it’s only a VM and I can roll back. Clearly on an important server you would do as much as possible as a non-root user.
Resources
Backup shell script for folders:daily_backup.sh
Backup MySQL databases: mysql_dumps.sh.v2
Backup
I have two backup scripts that run on my servers, one for backing up the folders “daily_backup.sh” and another for backing up the DB “mysql_dumps.sh” – both can be download for you to review – see “Resources” section of this post.
The folder backup includes backing up the wordpress folder “/srv/wordpress” and the apache config “/etc/httpd”. The other folders in the example script, like “/svr/conf” are non-WordPress folders.
The MySQL backup simply backs up the database by running:
mysqldump -f -u${DBUSER[$i]} -p${DBPASSWD[$i]} ${DBNAME[$i]} > $ARCHIVE_NAME
Then the dump is zipped up.
Restoring the backups
Restoring the DB
First thing to do is the DB. I have copied the DB dump to:
/srv/backup/MySQL_DB_Dump_#0_wordp_VMValiant.gz
So open a terminal and run the following to extract the dump file:
gunzip -cd MySQL_DB_Dump_#0_wordp_VMValiant.gz > MySQL_DB_Dump_#0_wordp_VMValiant.dmp
Then restore it by first logging in to the DB as root
mysql -u root -p
Then run the following:
drop database wordpress; -- Drop the database, if it exists and is called 'wordpress'
drop user wordp; -- Delete the user 'wordp'
create user wordp identified by '<my secret password>'; -- Create DB user
create database wordpress; -- Create the DB called 'wordpress'
grant all privileges on wordpress.* to 'wordp'@'%'; -- Give the user full rights to the DB from any location
Now that your DB is setup run the following to restore the DB dump:
mysql -f -u wordp -p wordpress< /srv/backup/MySQL_DB_Dump_#0_wordp_VMValiant.dmp
Restoring the file system
In my case the backup script I run creates a structure like:
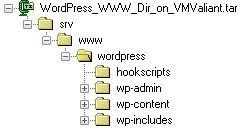
To be safe we will extract to a temp location. So the file is in “/svr/backup” so I run:
cd /srv/backup
tar xvzf WordPress_WWW_Dir_on_VMValiant.tar.gz
You need to copy the folder to where you are putting the files, so it is most likely different for you but for me:
mkdir -p /srv/www
cd /srv/backup/srv/www
cp -r wordpress /srv/www
cd /srv
chown -R apache.apache www
Obvious the last part is ensuring apache has access to the folders. Because it was a tar copy the permissions will already be correct.
Fix the configs
Firstly we need to fix the DB details etc. These are contained in the php config file, in my case:
/srv/www/wordpress/wp-config.php
Edit this file and change any DB details as required.
Next on the list is the Apache config file. One of the side tasks things my backup script does is to backup the Apache folders under “/etc/httpd” which brings httpd.conf along with the ssl.conf and any certificates.
When I upgrade Apache or JBoss or anything like that I find the best thing is do a compare between the out-of-the-box for the new instance against the original config – using a tool like BeyondCompare or kdiff. In this case the versions are both on Apache 2.4.x and comparing the configs I can still keep using the old one, so great.
So just copy of the following to the new Apache folder:
etc\httpd\conf.d\zoyinc.com.pem
etc\httpd\conf.d\zoyinc.com.cacert.pem
etc\httpd\conf.d\zoyinc.com.v2.key
etc\httpd\conf.d\zoyinc.com.v2.crt
etc\httpd\conf.d\ssl.conf
etc\httpd\conf\httpd.conf
Its really important to have everything in the same directories as they were in the old server otherwise you will need to carefully go over all the configs to see if there is anything you need to change.
Also don’t simply take all files across because that won’t work either.
systemctl stop httpd.service
cd /var/tmp
tar xvzf HTTPD_Conf_Dir_on_VMValiant.tar.gz

mv /etc/httpd/conf.d/zoyinc.com.pem /etc/httpd/conf.d/zoyinc.com.pem.ootb
mv /etc/httpd/conf.d/zoyinc.com.cacert.pem /etc/httpd/conf.d/zoyinc.com.cacert.pem.ootb
mv /etc/httpd/conf.d/zoyinc.com.v2.key /etc/httpd/conf.d/zoyinc.com.v2.key.ootb
mv /etc/httpd/conf.d/zoyinc.com.v2.crt /etc/httpd/conf.d/zoyinc.com.v2.crt.ootb
mv /etc/httpd/conf.d/ssl.conf /etc/httpd/conf.d/ssl.conf.ootb
mv /etc/httpd/conf/httpd.conf  /etc/httpd/conf/httpd.conf.ootb

cp etc/httpd/conf.d/zoyinc.com.pem /etc/httpd/conf.d/zoyinc.com.pem
cp etc/httpd/conf.d/zoyinc.com.cacert.pem /etc/httpd/conf.d/zoyinc.com.cacert.pem
cp etc/httpd/conf.d/zoyinc.com.v2.key /etc/httpd/conf.d/zoyinc.com.v2.key
cp etc/httpd/conf.d/zoyinc.com.v2.crt /etc/httpd/conf.d/zoyinc.com.v2.crt
cp etc/httpd/conf.d/ssl.conf /etc/httpd/conf.d/ssl.conf
cp etc/httpd/conf/httpd.conf  /etc/httpd/conf/httpd.conf
Restart Apache
Simply run:
systemctl start httpd.service
To start Apache and you are done