In the post CentOS 7 base VM for WordPress and MythTV I described how to create a base CentOS 7 VM. This post describes follows on from that post and describes the post installation tasks to make the VM a good solid base for me to run WordPress or MythTV.
When setting up a Linux server there are a lot of choices you make and some of the more important ones are around security. There is an enormous amount you can do to lock down a server but it comes at a cost to time, effort and inconvenience.
This setup is based on my requirements. My MythTV box is sitting on our LAN behind a reasonable firewall, it’s not used to surf the internet, it’s a media player.
The WordPress server is in a DMZ completely separated from the LAN – from the LAN you can get to it but it can’t get to the LAN. It is sitting behind the same SonicWall firewall. I am planning on setting up WordPress to do daily backups of the DB and filesystem. So if it gets hacked then I rollback to a “known good” copy of the VM and then the backups are restored to it. I don’t believe I need firewalls on the host and because only HTTP and HTTPS are exposed I think security is adequate.Initial stuff
Generic
Disable SE Linux
SE Linux has it’s place but it is complicated to administer and is not required for my boxes. When enabled it can cause all sorts of weird things not to work, things that I have spent hours trying to nut out only find it was SE Linux.
Best to disable it right at the beginning!
Backup and then edit the file /etc/selinux/config
Set the following:
SELINUX=disabled
Save the file
Disable the firewall
Run the following:
sudo systemctl stop firewalld
sudo systemctl disable firewalld
sudo systemctl mask –now firewalld
Install the GUI – User Manager
This appears under “Sundry” in desktop menu. Run the following:
yum install system-config-users
Miscellaneous
Run the following to install any missing items:
yum install telnet
Enable the epel repo
sudo yum install epel-release
rpm -Uvh http://rpms.famillecollet.com/enterprise/remi-release-7.rpm
Enable software collections, scl:
yum update
yum install centos-release-scl
yum install scl-utils-build
You should edit the file “/etc/yum.conf” and look for the line:
installonly_limit=5
Change this to a 2. This is to stop previous kernels filling up the “/boot” partition. See my post: Low Disk Space on “boot”
Restart the host
Would be good to restart the VM now, just to make sure everything still works and ensure that SELinux is disabled.
Create users and Groups
We some custom users and groups. Create the following:
groupadd sambaguest
useradd sambaguest -d /home/sambaguest -g sambaguest -s /bin/bash
groupadd backup
useradd backup -d /home/backup -g backup -s /bin/bash
Install MariaDB
MariaDB replaces MySQL but the version that comes with CentOS is 5.5.60 and we need version 10 for WordPress. You will note we have not yet selected to install either MariaDB or MySQL.
yum install rh-mariadb102
Enable the software collection and start the service
scl enable rh-mariadb102 bash
service rh-mariadb102-mariadb start
Setup MariaDB
mysql_secure_installation (If you exited bash you will have to run “scl enable rh-mariadb102 bash” again)
You will be prompted with some questions. Below are the questions and my answers:
Enter current password for root = This is the root database user, (First time this will be blank)
Set root password? [Y/n] = Y
New password: ******
Remove anonymous users? [Y/n] = Y
Disallow root login remotely? [Y/n] = n
Remove test database and access to it? [Y/n] = Y
Reload privilege tables now? [Y/n] = Y
I want to be able to connect remotely as the root user so run the following. Note when you first login remember it is the root password for the DB user remote. Where I have “<root password>, again this is the DB root user:
mysql -u root -p
GRANT ALL PRIVILEGES ON *.* TO ‘root’@’%’ IDENTIFIED BY ‘<root password>’ WITH GRANT OPTION;
GRANT ALL ON *.* to ‘root’@’%’;
use mysql;
UPDATE user SET authentication_string=PASSWORD(‘<root password>’) where User=’root’;
UPDATE user SET plugin=”mysql_native_password”;
FLUSH PRIVILEGES;
exit
The ‘WITH GRANT OPTION’ is important otherwise even though you did grant all privileges this doesn’t appear to include GRANT.
You should enable timezones which is required for MythTV if not others. Ensure you are still running “scl enable rh-mariadb102 bash”. Run the following
mysql_tzinfo_to_sql /usr/share/zoneinfo | mysql -u root mysql -p
This will prompt you for the password for the root user in MariaDB – not the Unix account, the MariaDB root account. You may also get some warnings :
[root@mythsvr2 ~]# mysql_tzinfo_to_sql /usr/share/zoneinfo | mysql -u root mysql -p
Enter password:
Warning: Unable to load '/usr/share/zoneinfo/leapseconds' as time zone. Skipping it.
Warning: Unable to load '/usr/share/zoneinfo/tzdata.zi' as time zone. Skipping it.
Now enable MariaDB so it will autostart:
systemctl enable rh-mariadb102-mariadb.service
At this stage I would try to connect remotely as root, using say HeidiSQL. I would then restart the VM and double check that Maria has restarted – it should do.
PostgreSQL 10
This is available in Software collections so begin by installing:
yum install rh-postgresql10 rh-postgresql10-postgresql-devel
Now scl enable PostgreSQL, initialize the DB then enable and start the service:
scl enable rh-postgresql10 bash
postgresql-setup –initdb
systemctl enable rh-postgresql10-postgresql.service
service rh-postgresql10-postgresql start
Note “–initdb” doesn’t ask any questions, just initializes.
To enable remote access, from the LAN etc, we need to edit two files “pg_hba.conf” and “postgresql.conf”. Because this is running under software collections the folder is:
/var/opt/rh/rh-postgresql10/lib/pgsql/data
So run the following commands
systemctl stop rh-postgresql10-postgresql.service
cd /var/opt/rh/rh-postgresql10/lib/pgsql/data
cp pg_hba.conf pg_hba.conf.ootb
cp postgresql.conf postgresql.conf.ootb
Now edit postgresql.conf using your favorite editor and add the following lines at the bottom: access:
# centos7-base customizations
listen_addresses = ‘*’
Now edit “pg_hba.conf” in the same folder and add the following lines:
host all all 0.0.0.0/0 md5
host all all ::/0 md5
In the same file, “pg_hba.conf”, look for the following lines near the bottom:
# “local” is for Unix domain socket connections only
local all all peer
# IPv4 local connections:
host all all 127.0.0.1/32 ident
and change the highlighted text to as below:
# “local” is for Unix domain socket connections only
local all all trust
# IPv4 local connections:
host all all 127.0.0.1/32 trust
Now restart PostgreSQL and try to connect from your LAN computer.
We now need to create a DB “root” user. This is different from the Linux account “root”. Because we need to do this via scl and scl clears environment variables, we can’t simply run “psql” we need to run the following:
su – postgres -c ‘scl enable rh-postgresql10 — psql’
This should put you into psql with a prompt “postgres=#”. To create the “root” DB user run:
CREATE ROLE root SUPERUSER LOGIN PASSWORD ‘<my root DB password>’;
To exit psql type “\q<enter>”.
At this point it would be a good idea to restart the VM and check that PostgreSQL starts on boot and that the login also works.
Apache, PHP and Python
To install Apache 2.4, PHP 7.2 and Python 3.6 and have them all working together I installed them all using Software Collections. You can read about what I did in the post CentOS 7 + PHP 7.2 + Python 3.6 + Apache 2.4
Create Apache users
I authenticate my users using basic authentication created by Apache’s htpasswd. For this box we will create some custom users.
Run
scl enable httpd24 bash
htpasswd -c /srv/conf/apache.users tony
htpasswd /srv/conf/apache.users svnanonymous
exit
So this will create the file and create a user “tony” and one called “svnanonymous”. Also create an Apache group file:
admin: tony
family: tony jackie josh
svn: tony jackie josh svn
Self-signed SSL certificate
The goal is not to use self-signed certificates are these are not trusted by default. However should you want to go down this path, this is what to do.
You should follow the instructions in the post Adding an SSL certificate to Apache , however, as you know we are using the software collections httpd24, which is the Apache httpd, so when the instructions say to move to:
cd /etc/httpd/conf.d
You should instead move to:
/opt/rh/httpd24/root/etc/httpd/conf.d
Otherwise the instructions are fine for creating the ssl certificate.
Next you need to edit the ssl config file for Apache. So edit:
/opt/rh/httpd24/root/etc/httpd/conf/ssl.conf
Add:
NSSEnforceValidCerts off
Change:
SSLCertificateFile /etc/pki/tls/certs/localhost.crt
to
SSLCertificateFile /opt/rh/httpd24/root/etc/httpd/conf.d/zoyinc.com.crt
Then change:
SSLCertificateKeyFile /opt/rh/httpd24/root/etc/httpd/conf.d/zoyinc.com.key
to:
SSLCertificateFile /opt/rh/httpd24/root/etc/httpd/conf.d/zoyinc.com.key
You can test your changes by running:
scl enable http24-httpd bash
httpd -t
exit
Tomcat
Follow the instructions in Installing Tomcat 9 behind Apache on CentOS 7
Subversion
Running SVN and using it in Apache and running Apache via scl means SVN also has to be run in scl. The bit that is not obvious is the software collection you need is actually sclo-subversion19.
Note that for software collections:
- “rh-” signifies “Red Hat’s collections available in Red Hat Software Collections product“, see SpecialInterestGroup/SCLo – CentOS Wiki
- “sclo-” signifies “Software Collections not being rebases of RHSCL collections“, “collections created by the community“. Also see SpecialInterestGroup/SCLo – CentOS Wiki
So you should install sclo-subversion and a number of supporting packages
yum install sclo-subversion19 sclo-subversion19-mod_dav_svn sclo-subversion19-subversion-devel sclo-subversion19-subversion-python sclo-subversion19-subversion-tools
For our purposes the important module is “sclo-subversion19-mod_dav_svn” this delivers the following files:
/opt/rh/httpd24/root/etc/httpd/conf.modules.d/10-subversion.conf
/opt/rh/httpd24/root/usr/lib64/httpd/modules/mod_authz_svn.so
/opt/rh/httpd24/root/usr/lib64/httpd/modules/mod_dav_svn.so
/opt/rh/httpd24/root/usr/lib64/httpd/modules/mod_dontdothat.so
These are clearly the modules we need for Apache.
Create an empty SVN repo if you don’t have one:
scl enable sclo-subversion19 bash
cd /srv
mkdir svn
svnadmin create /srv/svn/zoyinc
chown -R apache.apache svn
exit
Lets create an SVN access file. Create file an access file:
mkdir -p /srv/conf
/srv/conf/svn.access
An example one would be:
[groups]
svnadmin = tony
svnanonymous = svnanonymous

[zoyinc:/]
@svnadmin = rw
* =
@svnanonymous =
Note in the above it is dependant on the earlier section, “Create Apache users”.
Then give it rights apache.apache
chown apache.apache /srv/conf/svn.access
Update the Apache ssl config:
/opt/rh/httpd24/root/etc/httpd/conf.d/ssl.conf
find the line:
</VirtualHost>
Just before the above add the following:
<Location /svn>
   DAV svn
   SVNListParentPath on
   SVNParentPath /srv/svn
   AuthzSVNAccessFile /srv/conf/svn.access
   SSLRequireSSL
   AuthType Basic
   AuthName "zoyinc.com"
   AuthUserFile /srv/conf/apache.users
   AuthGroupFile /srv/conf/apache.groups
   Require group svn
</location>
Samba
Setup a base smb.conf file. Backup the existing one:
cp /etc/samba/smb.conf /etc/samba/smb.conf.ootb
and replace the contents with the sample Samba config file at the bottom of this article.
The sample smb.conf file requires a couple of folders and users that we created earlier:
mkdir -p /mnt/public
chown -R sambaguest.sambaguest /mnt/public
chmod -R 777 /mnt/public
mkdir -p /srv/backup
chown -R backup.backup /srv/backup
chmod -R 770 /srv/backup
Then enable and start the services
systemctl enable smb.service
systemctl enable nmb.service
systemctl restart smb.service
systemctl restart nmb.service
Remember for any users in Samba you need to create them so for example:
smbpasswd -a backup
This will prompt for a password for the user “backup”.
Samba troubleshooting
Test tools
testparm
This is a Samba tool which will validate your smb.conf file and will give you a “dump of your service definitions”. Note that the dump is not simply a copy of smb.conf it is what are the effective settings. This is a very handy tool.
Hostname
The maximum length of a netbios name is 15 characters and people will always assume the hostname matches the netbios name, so this means the hostname needs to be no more than 15 characters. Originally I called my VM “centos7-template”, which is 16 characters, so had to rename “centos7-base”.
Getting guest working
The “map to guest = bad user” parameter maps login attempts with bad usernames to the guest user,
File limit warning
If you run testparm and see the following warning:
rlimit_max: increasing rlimit_max (1024) to minimum Windows limit (16384)
Edit “/etc/security/limits.conf” and add the following to the end of the file:
* – nofile 16385
This will permanently fix the warning. You will need to restart the VM for this to be effective. You can also make a temporary change to the file limit by running:
sysctl -w fs.file-max=16385
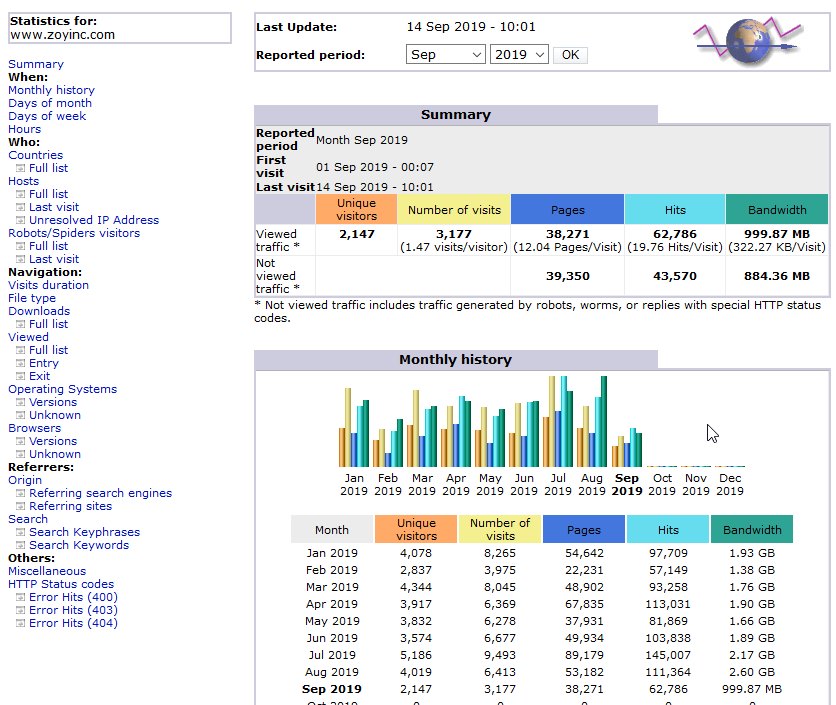
AWStats – logfile analyzer
AWStats is a great general purpose log file analyzer. I have been using it since 2012 and it is still going strong. Its a really handy way to see if people are actually coming to your site and where they are coming from and so on.
Install the rpm:
yum install awstats
Be warned it has heaps of dependancies, all of which are perl packages.
Run the config as below, it is recommended to cd to the awstats root first:
cd /usr/share/awstats
tools/awstats_configure.pl
These are the options I chose:
Do you want to continue setup from this NON standard directory [yN] ? Y
Config file path (‘none’ to skip web server setup): /opt/rh/httpd24/root/etc/httpd/conf/httpd.conf
Do you want me to build a new AWStats config/profile file (required if first install) [y/N] ? Y
Your web site, virtual server or profile name: www.zoyinc.com
Directory path to store config file(s) (Enter for default): <Enter>
The config file is:
/etc/awstats/awstats.www.zoyinc.com.conf
You now need to modify the Apache config. This is because the awstats changes are for httpd 2.2 but we are running 2.4 so it goes from:
Order allow,deny
Allow from all
to
Require all granted
If you don’t make this change you will get this error:
Forbidden
You don’t have permission to access /awstats/awstats.pl on this server.
So open up the Apache config file:
/opt/rh/httpd24/root/etc/httpd/conf/httpd.conf
Look for the awstats section:
#
# This is to permit URL access to scripts/files in AWStats directory.
#
<Directory “/usr/share/awstats/wwwroot”>
Options None
AllowOverride None
Order allow,deny
Allow from all
</Directory>
This needs to be changed to:
<Directory “/usr/share/awstats/wwwroot”>
Options None
AllowOverride None
# Order allow,deny
# Allow from all
Require all granted
</Directory>
Then restart Apache:
systemctl restart httpd24-httpd.service
To check the changes are correct now that you have made the Apache changes and restarted Apache, you should visit some pages on your web server. Now have a look at the access log:
tail -n 100 /var/log/httpd24/access_log
The latest entries in the log, after the changes and restart, should look like:
192.168.202.237 - - [11/Sep/2019:21:44:55 +1200] "GET /awstatsicons/clock/hr6.png HTTP/1.1" 200 314 "http://centos7-base/awstats/awstats.pl?config=www.zoyinc.com&framename=mainright" "Mozilla/5.0 (Windows NT 10.0; Win64; x64; rv:69.0) Gecko/20100101 Firefox/69.0"
192.168.202.237 - - [11/Sep/2019:21:44:55 +1200] "GET /awstatsicons/clock/hr7.png HTTP/1.1" 200 316 "http://centos7-base/awstats/awstats.pl?config=www.zoyinc.com&framename=mainright" "Mozilla/5.0 (Windows NT 10.0; Win64; x64; rv:69.0) Gecko/20100101 Firefox/69.0"
This is because the awstats config changes the format.
Now we need to install GeoIP
This is so we can get country info based on IP. So do the following:
yum install perl-CPAN
Then:
perl -MCPAN -e “install Geo::IP::PurePerl”
You will get various questions, I just hit <Enter> to accept defaults. Be warned it will seem long and take a little time!
Then run:
perl -MCPAN -e “install Geo::IP”
It will take a little bit but not as long as first one.
Look for the following line in the config file, /etc/awstats/awstats.www.zoyinc.com.conf :
#LoadPlugin=”geoip6 GEOIP_STANDARD /pathto/GeoIPv6.dat”
Uncomment the line and change the path so it becomes:
LoadPlugin=”geoip6 GEOIP_STANDARD /usr/share/GeoIP/GeoIP.dat“
Search for:
LogFile=”/var/log/httpd/access_log”
And change to:
LogFile=”/var/log/httpd24/access_log”
Now do an initial run
cd /usr/share/awstats/wwwroot/cgi-bin
awstats/awstats.pl?config=www.zoyinc.com
Now you need to add a cron job as the root user. So run:
crontab -e
This will drop you into vi to edit the crontab. Add the following entry:
0 0 * * * /usr/share/awstats/wwwroot/cgi-bin/awstats.pl -update -config=www.zoyinc.com >/dev/null 2>&1
This will run an update each day at midnight.
Copy AWStats data from old server to new
If you are migrating to a new server and want to bring your historical AWStats data then you just need to copy the data files.
In the config file, /etc/awstats/awstats.www.zoyinc.com.conf, the setting “DirData” describes where the data is stored. Just copy the old data from the old to the new. For me this was in:
/var/lib/awstats
You can get to AWStat at:
https://centos7-base/awstats/awstats.pl?config=www.zoyinc.com
Resources
Mystery Data: Upgrade Mariadb 5.5 to Mariadb 10.2 on Centos 7 VestaCP
https://www.mysterydata.com/upgrade-mariadb-5-5-to-mariadb-10-2-on-centos-7-vesta-cp/
Red Hat: How to set up a LAMP stack on Red Hat Enterprise Linux 7
https://developers.redhat.com/blog/2017/03/07/how-to-set-up-a-lamp-stack-on-red-hat-enterprise-linux-7/
TecAdmin: How To Install PHP 7.3, 7.2, 7.1 on CentOS/RHEL 7.6
https://tecadmin.net/install-php7-on-centos7/
Next Cloud: Installing PHP 7.2 on RHEL 7 and CentOS 7
https://docs.nextcloud.com/server/15/admin_manual/installation/php_72_installation.html
– An excellent article on using software collections on CentOS 7 and PHP 7.2 on Apache httpd
Red Hat: How can I make a Red Hat Software Collection persist after a reboot/logout?
https://access.redhat.com/solutions/527703
Manage IQ: Developer setup guide Postgresql software collection
http://manageiq.org/docs/guides/developer_setup/postgresql_software_collection
Big Binary: Configure PostgreSQL to allow remote connection
https://blog.bigbinary.com/2016/01/23/configure-postgresql-to-allow-remote-connection.html
AWStats Documentation – Setups Page
http://www.awstats.org/docs/awstats_setup.html
Plesk: How to confugure GeoIP plugin for AWStats
https://support.plesk.com/hc/en-us/articles/115002097389
Samba Config file – smb.conf
#
# Sample Samba config file
# /etc/samba/smb.conf
#
# From Zoyinc.com
#
# Global parameters
#
[global]
        domain master = No
        guest account = sambaguest
        load printers = No
        local master = No
        log file = /var/log/samba/log.%m
        logon path = /home/sambaguest
        logon script = startup.bat
        map to guest = Bad User
        max log size = 50
        name resolve order = lmhosts bcast
        os level = 99
        server string = CentOS7 Base
        time server = Yes
        workgroup = CANTABRIAN
        idmap config * : backend = tdb
        create mask = 0774
        directory mask = 0774
        force create mode = 0774


[public]
        comment = Public
        create mask = 0775
        directory mask = 0775
        dos filemode = Yes
        fake directory create times = Yes
        force create mode = 0000
        force group = sambaguest
        force user = sambaguest
        fstype = FAT
        guest ok = Yes
        hide dot files = No
        map archive = No
        path = /mnt/public
        read only = No


[backup]
        comment = Backups
        create mask = 0775
        directory mask = 0775
        dos filemode = Yes
        fake directory create times = Yes
        force create mode = 0000
        force group = backup
        force user = backup
        fstype = FAT
        hide dot files = No
        map archive = No
        path = /srv/backup
        read only = No